Mistakes Homeowners Make During DIY Rubbish Clearances
DIY rubbish clearance can look straightforward at first glance. You gather the mess, hire a van, load it up, and take it away. Simple, right? Not quite. In reality, the most common mistakes homeowners make during DIY rubbish clearances are the ones that turn a weekend job into a stressful, expensive, and sometimes unsafe project.
Maybe you're clearing a garage that has slowly turned into a graveyard for old paint tins, broken toys, and damp cardboard. Or maybe it's a loft that has been quietly collecting "I'll deal with it later" clutter for years. Either way, the same issues keep showing up: poor planning, unsafe lifting, wrong disposal choices, and underestimated costs. This guide breaks all of that down in plain English so you can avoid the traps and clear your rubbish properly the first time.
It also helps to know when a job is better handled by a professional team offering waste removal or a more specific service like garage clearance or loft clearance. That can save a lot of faff, and honestly, your back too.
Why this matters
DIY rubbish clearance matters because waste is not just "stuff to get rid of". It can be bulky, sharp, heavy, dusty, damp, contaminated, or simply awkward. Once you start moving it, every weak point in the plan tends to show up at once. That's where homeowners get caught out.
A small mistake can create a chain reaction. You fill a car too full and need a second trip. You mix recyclable items with general waste and slow everything down. You throw away a broken mirror without wrapping it and end up with cuts. You put a bag in the wrong bin stream and suddenly it becomes a council issue, not a simple tidy-up. Not ideal.
For many households, this matters most when time is tight. A move-out deadline, a renovation, a bereavement clearance, a new baby on the way, or a garden that has become unusable all make rubbish feel more urgent. A rushed job nearly always leads to avoidable errors. That is the real issue: DIY clearance is rarely difficult because of one huge problem; it is difficult because of ten small ones all arriving together.
Expert summary: DIY rubbish clearance works best when homeowners treat it like a small project, not a spontaneous chore. Sort first, lift safely, separate materials, plan transport, and know when to stop. That simple discipline prevents most of the expensive mistakes.
How DIY rubbish clearance works
At a practical level, DIY rubbish clearance usually follows five steps: assess the waste, sort it, gather the right equipment, move it safely, and dispose of it through the proper route. Sounds tidy on paper. In real life, it is often a bit messier.
The first stage is deciding what you actually have. Household clutter, furniture, garden waste, DIY rubble, electrical items, mattresses, and general rubbish all behave differently. A bag of old clothes is not the same as broken tiles. A rusty metal frame is not the same as food waste. If you lump everything together, you lose control of the process almost immediately.
The second stage is separation. Useful items might be donated, reused, or passed on. Some bulky items may need dismantling. Hazardous or awkward waste needs extra care. This is where a lot of homeowners make their first mistake: they start loading before they've sorted. It feels efficient, but it usually isn't.
The final stage is disposal. That might mean council facilities, a licensed clearance provider, or a combination of both depending on the load. If the rubbish includes furniture, you may also want to look at furniture clearance or furniture disposal options instead of dragging a sofa down the stairs yourself. Honestly, a two-person lift and a narrow hallway can become a comedy sketch very quickly.
Key benefits and practical advantages
DIY rubbish clearance can work well when the job is small, straightforward, and well planned. Done properly, it gives you control over timing, sorting, and the pace of the work. That is a genuine benefit, especially if you prefer to keep costs down or you want to tackle the job gradually over a few days.
There are a few practical advantages worth noting:
- You can sort items carefully and separate reuse, recycling, and waste.
- You can work around your schedule rather than fitting into a booking slot.
- You may reduce disposal costs if you already have transport and the waste volume is small.
- You get a better view of what you own, which is surprisingly useful during a move or renovation.
- You can clear at your own pace and make decisions item by item.
That said, the benefits only hold if the process stays under control. Once the load becomes bulky, mixed, or hard to move, the advantages shrink fast. A good rule of thumb? If you're beginning to use the words "maybe later" more than "we've got this", the job is getting away from you.
For bigger or more awkward clearances, a specialist team offering home clearance or house clearance can often be the simpler, safer route.
Who this is for and when it makes sense
This topic is most relevant for homeowners, landlords, tenants, and anyone clearing a property after building work, decorating, or a long period of accumulation. It also applies to people who are trying to manage waste without overpaying for help they may not need.
DIY rubbish clearance makes sense when:
- the volume is relatively small and manageable;
- the items are mostly non-hazardous;
- you already have a suitable vehicle or access to one;
- you can lift and sort items safely;
- you have time to dispose of the waste properly.
It tends to make less sense when the clearance includes mixed materials, heavy furniture, loft access, damp waste, building debris, or lots of repeated trips. In those cases, the hidden cost is usually not the waste itself but the time, strain, and uncertainty.
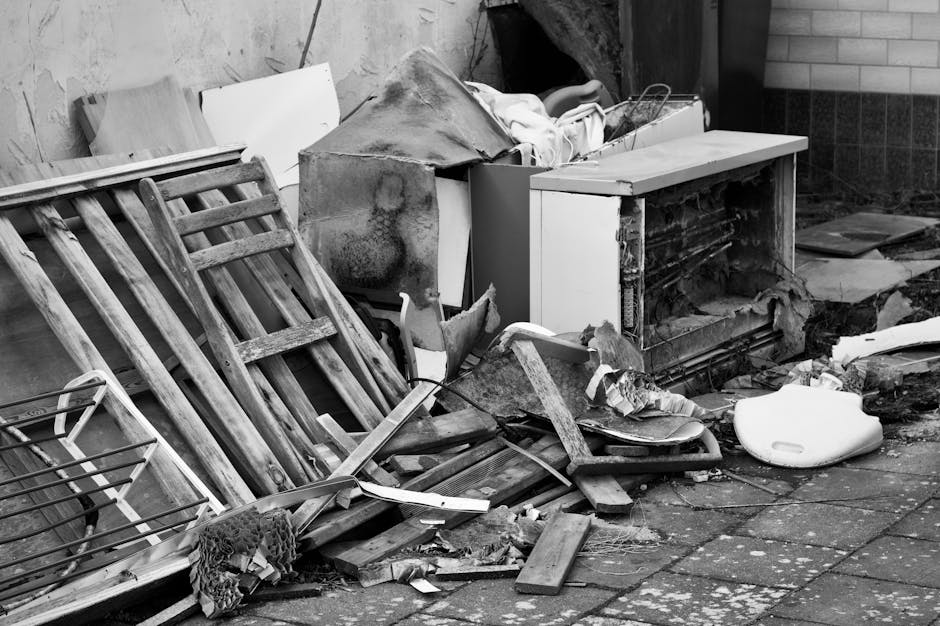
A common scenario is a family clearing a garage at the weekend. The job starts with old boxes and ends with a cracked garden bench, a broken freezer, a mystery bag of wires, and no real idea where anything should go. Sound familiar? That is exactly where mistakes creep in.
If the task is a single room or a specific space, you may also find a focused service like flat clearance or garden clearance more efficient than trying to improvise everything yourself.
Step-by-step guidance
If you want to avoid the most common DIY mistakes, break the job into stages. Don't just start hauling things outside. That is how people end up with blocked hallways, torn bags, and one very grumpy neighbour looking at the mess by 8:15 on a Saturday morning.
1. Walk through the space first
Look at everything before lifting anything. Identify obvious categories: furniture, general rubbish, electronics, metal, wood, garden waste, rubble, and anything that might be hazardous. Estimate how much there is and whether you'll need help.
2. Decide what stays, goes, or gets reused
Be ruthless, but sensible. Items in good condition may be worth donating or reusing. Broken, stained, damp, or unsafe items are usually best treated as waste. If you are unsure, set it aside rather than mixing it in too early.
3. Gather the right supplies
You will usually need heavy-duty sacks, gloves, protective shoes, a torch for darker spaces, tape, labels, and possibly a sack truck or trolley. For dusty lofts or old sheds, a mask can be sensible. For sharp waste, consider thicker gloves and tougher bags. No heroics required.
4. Create a loading order
Put the heaviest, flattest items in first and protect fragile surfaces. This matters when loading a vehicle because bad stacking wastes space and increases the risk of damage. A bit of order here saves a lot of awkward reshuffling later.
5. Dispose of each waste type properly
Not all waste should go to the same place. Recyclables, green waste, bulky waste, metal, and builder's materials often need separate handling. If the waste came from DIY works, builders waste clearance may be more appropriate than general rubbish disposal, especially where rubble or offcuts are involved.
6. Do a final sweep
Check corners, under shelves, behind appliances, and inside cupboards. It is always the last 5% of the job that makes it feel complete. Truth be told, that little sweep often saves you from discovering a forgotten bag two weeks later when the smell starts...
Expert tips for better results
Here are the habits that make the biggest difference in the real world:
- Start with the awkward items. If you leave the heavy or dirty stuff until the end, you are more likely to cut corners.
- Measure doorways and access routes before moving bulky waste. A sofa does not magically become smaller halfway down the stairs.
- Keep one area clear for sorting. Even a small patch of floor or driveway makes the process calmer.
- Use separate piles or bags. Mixing everything together increases disposal time and confusion.
- Don't overload sacks or bins. Torn bags and strained backs are a bad trade.
- Plan for rain. British weather has a habit of arriving uninvited.
- Book time for the disposal run. Leaving it until "after lunch" often means it never happens.
A practical tip from experience: if you think a job will take two hours, give yourself four. That extra buffer absorbs the little surprises, like a wardrobe panel that needs unscrewing or a bag that turns out to be heavier than it looked.
And if the clearance is tied to a rented space, office move, or mixed property use, a broader service such as office clearance or business waste removal may be worth considering for the bits that do not fit a normal household route.
Common mistakes to avoid
This is the heart of it. Most homeowner errors are not dramatic. They are ordinary, believable, and easy to repeat. The trick is spotting them before they snowball.
1. Not planning the waste stream
The biggest mistake is starting without knowing where each type of waste will end up. This leads to wasted journeys, confusion at disposal sites, and a lot of re-sorting on the driveway.
2. Underestimating weight and volume
Bins and sacks fill faster than people expect. Old books, tiles, wet cardboard, garden soil, and broken furniture all weigh more than they look. That "small pile" can become a van load very quickly.
3. Mixing everything together
It feels efficient to make one huge pile, but that can turn recycling into general waste and create extra handling later. Separation up front saves time downstream. Not glamorous, but effective.
4. Ignoring safety
Homeowners often skip gloves, forget sturdy footwear, or try to move heavy items alone. Cuts, slips, and back strain are common enough to deserve respect. If something feels unstable, it probably is.
5. Disposing of items in the wrong place
Leaving waste by a bin, fly-tipping it, or putting prohibited materials in the wrong container can create serious problems. Even small-scale mistakes can lead to complaints or rejected loads.
6. Forgetting hidden waste
Behind furniture and inside lofts there are usually forgotten items: cables, loose fixings, old paint, broken glass, dust, and random bits of metal. Those are the things that catch hands and scratch floors.
7. Dismantling items without the right tools
People often start taking apart wardrobes or beds without checking how they were assembled. That can strip screws, split timber, and make the load bulkier, not smaller.
8. Treating all waste as the same
Garden clippings, rubble, textiles, furniture, and electricals are handled differently in practice. If you're dealing with mixed waste, pause and reassess rather than forcing it into one disposal route.
9. Leaving the final disposal decision too late
By the time the bags are full, many homeowners realise they have no plan for the last stage. That is when a quick tidy-up becomes a logistics problem.
10. Doing too much in one go
A classic mistake is trying to clear the whole property in one push. Energy drops, judgement gets sloppier, and things start getting tossed into the nearest bag. A better approach is often room-by-room or zone-by-zone.
Tools, resources and recommendations
You do not need a shed full of specialist kit, but the right basics make a big difference.
| Tool or resource | Why it helps | Best used for |
|---|---|---|
| Heavy-duty gloves | Protects hands from splinters, rust, and sharp edges | General clearance, garden waste, old furniture |
| Sturdy sacks or rubble bags | Reduces tearing and accidental spills | Mixed household rubbish, DIY debris |
| Sack truck or trolley | Helps move heavy items without overstraining | White goods, boxes, bulky loads |
| Labels or marker pens | Keeps waste categories clear | Sorting recyclables, reuse items, special waste |
| Torches and batteries | Improves visibility in lofts, garages, and sheds | Dark storage spaces |
| Basic measuring tape | Checks access and item dimensions before moving | Bulky furniture and awkward corners |
For homeowners who want a cleaner, less stressful route, it can be sensible to compare the DIY approach with a professional service. If the job includes a garage, loft, or a full property reset, the time saved can be significant. The same goes for awkward furniture that needs lifting, breaking down, and moving carefully.
If you care about responsible disposal and reuse, it is also worth reading about recycling and sustainability. A lot of people want to do the right thing, they just need a clearer path to do it.
Law, compliance and best practice
Here's the cautious bit, and an important one. In the UK, homeowners are still expected to dispose of waste responsibly. That means using lawful, sensible routes and avoiding anything that could be seen as fly-tipping or careless disposal. If a waste carrier is involved, it should be someone you trust to handle the load properly.
Best practice is simple, even if the details vary by location:
- keep different waste types separate where practical;
- check whether items need special handling;
- do not leave rubbish where it can cause nuisance or obstruction;
- store waste safely until collection or disposal;
- use a proper, lawful disposal route rather than guessing.
If you are clearing out items that could raise safety concerns, it is wise to read the provider's health and safety policy and insurance and safety information before booking help. That is not overkill; it is sensible due diligence.
Payment, terms, and what happens if access is difficult are also worth checking in advance. In fairness, the boring admin is usually where misunderstandings start. The practical pages on payment and security, terms and conditions, and pricing and quotes can help set expectations before anyone starts moving heavy bags.
Options and comparison table
There is no single right answer for every homeowner. The best option depends on the amount of waste, the type of waste, and how much lifting and sorting you want to do yourself.
| Option | Best for | Advantages | Trade-offs |
|---|---|---|---|
| Pure DIY clearance | Small, light, well-sorted loads | Maximum control, flexible timing | More lifting, planning, and disposal work |
| DIY with vehicle hire | Moderate loads and planned clear-outs | Useful capacity, fewer trips | Hire cost, loading effort, fuel, time pressure |
| Professional waste removal | Bulky, mixed, or time-sensitive jobs | Less physical strain, faster completion | Higher upfront spend than doing everything yourself |
| Specialist room clearance | Specific spaces like lofts, garages, gardens, or flats | Tailored approach, easier handling of awkward access | May be more structured than a simple DIY run |
If your main issue is furniture, a dedicated route such as furniture clearance can be more efficient than treating everything as generic rubbish. That small distinction can save a lot of time, especially if there are stairs or narrow doors involved.
Case study or real-world example
Consider a typical homeowner clearing a semi-detached house after a room refurbishment. The initial plan is simple: remove old shelves, broken boxes, leftover packaging, a damaged chair, and some garden waste from the side return. It looks like a half-day job.
Then the problems start. The chair won't fit through the hallway without being dismantled. The packaging is bulkier than expected. The garden waste is damp, so the bags are heavier. A few screws have been mixed into the general rubbish. And because the load was not sorted early, the homeowner has to keep stopping to recheck what goes where. By mid-afternoon, the task feels twice as long as expected.
The fix in that situation is not more effort. It is better sequence. Sort first. Clear the access route. Separate recyclable packaging. Deal with bulky furniture before smaller rubbish. Keep one area as a staging point. Suddenly the job becomes manageable again. Not easy, exactly. Just manageable.
This is also the point where many people realise that a simple DIY approach would have been fine for the small bags, but not for the heavier or more awkward items. A professional home or house clearance service often becomes a better fit once the clutter stops being "a few bits" and becomes a real project.
Practical checklist
Use this before you start. It is the sort of list that prevents the "why didn't I think of that?" moment later on.
- Have I sorted the waste into clear categories?
- Do I know which items need special handling?
- Have I checked access paths, stairs, and door widths?
- Do I have gloves, sturdy shoes, and strong bags?
- Am I lifting anything that should really be moved by two people?
- Is there a safe place to stage the rubbish before disposal?
- Do I know where each waste type is going?
- Have I allowed extra time for sorting and loading?
- Is the weather likely to make things worse?
- Have I checked the final space for forgotten items?
Quick takeaway: most DIY clearance mistakes happen before the first bin bag is lifted. Planning is the job. The lifting is just the visible bit.
And if the clear-out is spilling beyond one room, a focused service like garage clearance or garden clearance can turn a messy weekend into a much calmer one.
Get a free quote today and see how much you can save.
Conclusion
DIY rubbish clearance can be a smart, practical choice, but only when the job is planned properly and the limits are understood. The main mistakes homeowners make during DIY rubbish clearances usually come down to rushing, mixing waste types, ignoring safety, and underestimating how heavy or awkward the load really is.
If you take anything from this guide, let it be this: sort first, move carefully, and do not let a small tidy-up become a stressful all-day ordeal. Sometimes the most efficient choice is the one that saves your time, your energy, and your weekend.
Do the job well, and the space feels lighter almost immediately. That's a good feeling. Properly good, actually.
Frequently Asked Questions
What are the most common mistakes homeowners make during DIY rubbish clearances?
The most common mistakes are failing to sort waste first, lifting heavy items unsafely, underestimating the volume, mixing recyclable materials with general rubbish, and leaving disposal planning until the end.
Is DIY rubbish clearance cheaper than hiring a professional service?
It can be cheaper for small, simple loads if you already have the right transport and disposal route. Once the job becomes bulky, mixed, or time-consuming, the savings can disappear quite quickly.
What rubbish should never be mixed into a general DIY clearance load?
Anything that needs special handling, or anything you are unsure about, should be separated. That includes items like certain electricals, sharp waste, damp materials, and builder's debris that may need a different disposal route.
How do I know if my clear-out is too big for DIY?
If you need multiple trips, help with lifting, or several separate disposal decisions, the job may be too large for an easy DIY approach. A loft, garage, or whole-house clear-out often grows larger than expected.
Do I need special equipment for a home rubbish clearance?
You may not need much for a small job, but good gloves, sturdy sacks, a torch, and strong footwear are useful basics. For heavier items, a sack truck or trolley can make a big difference.
Can I clear furniture myself?
Yes, if the items are manageable and access is straightforward. But furniture is often awkward, heavy, or hard to dismantle, so many homeowners find a dedicated furniture clearance option easier.
What is the safest way to move bulky waste downstairs?
Check the route first, clear obstacles, use two people where needed, and avoid twisting while lifting. If the item feels unstable or too heavy, stop and rethink the plan rather than forcing it.
Why do DIY rubbish clearances take longer than expected?
Because sorting, carrying, loading, and disposal usually take longer than people first assume. Small delays add up fast, especially if items have to be dismantled or separated.
Are there legal risks if I dispose of rubbish incorrectly?
There can be. Homeowners are expected to dispose of waste responsibly, and careless disposal can create problems. If you are unsure, use a lawful route and take extra care with how the waste is handled.
Should I hire a van for rubbish clearance?
Hiring a van can make sense if the load is moderate and you have a clear disposal plan. But do check the size of the waste first, because a van hire is only useful if you can load it safely and legally dispose of everything afterwards.
What is the best way to prepare for a garage or loft clearance?
Start by sorting items into categories, then create a clear working area and check access before moving anything. Loft and garage spaces usually hide more waste than they seem to at first glance.
When should I choose professional waste removal instead?
If the waste is bulky, heavy, mixed, or time-sensitive, professional help is often the calmer option. It is especially sensible where access is awkward or the job has started to drift beyond a simple tidy-up.


